The following programs are used in this chapter: WindHex 32, TileLayer Pro,
Notepad (or a plain text editor of your choice), TaBuLar
The following files are used in this chapter: silius.nes ("Journey to Silius" NES ROM)
More files will be generated by the user during the article. Samples will be provided at its
conclusion.
In the previous article, we learned the basics of finding and changing text data in games that use American Standard Code for Information Interchange as their text storage format. Unfortunately, a microscopically small proportion of games store their text data in ASCII, at least insofar as older consoles are concerned; this may be changing as the technology gets more and more advanced. Fortunately for us, however, editing non-ASCII text data proves to be almost trivially easy.
This chapter will cover the basic sort of non-ASCII text data you'll find in most games. The techniques you'll read about here won't work for every game, mind -- sometimes the text will be encoded in 16 bits, sometimes it'll have simple dictionary/substring, or DTE compression built in, and sometimes more advanced compression techniques will render the text data entirely uneditable by romhacking-standard hex editors. Still, this should work for a large proportion of games. Generally speaking, as technology gets more and more complex so does text data storage, which is why you might hear people telling you to "start small" with an NES or Gameboy game. This is largely true -- the newer the system, the greater the chance your text data will be somehow obscured in one of the above-listed manners. They will be covered in future articles.
|
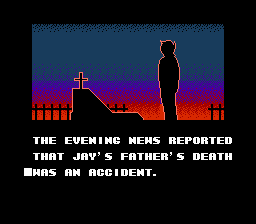
| Dig out "Journey to Silius" for the NES, your favorite emulator and WindHex32. The screenshot to the right appears in the game's introduction, but it completely eludes us if we attempt to edit it using the techniques detailed in the previous article. In cases such as this, we use a technique called a "relative search" to find the text data. A relative search is based on the principle that for any given value of A, B will always be equal to A+1. If A was 0x0F, B would be 0x10. If A were 0x41, B would be 0x42. If A were 0xFF, B would overflow to 0x0100 and you'd have a problem for most normal text systems, heh. More on this later. |
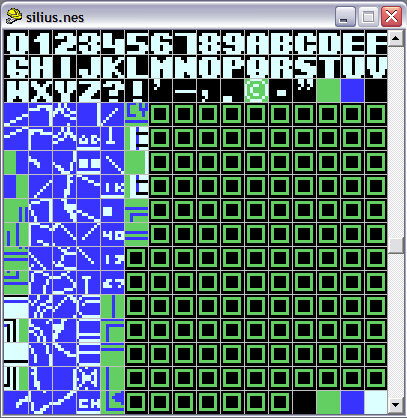
| As you may or may not know, the NES (and SNES, Gameboy, GameGear, and a lot of other older systems) display two things to their screen - tiles and sprites. Sprites can be placed anywhere on the screen but are very limited in number; tiles, on the other hand, comprise most of the picture you see, including all of the "background" as it were. Tiles are 8x8, in general. If you were to draw horizontal and vertical gridlines every eight pixels, you'd come up with a series of rows and columns of equally-sized tiles, as shown in the picture to the right. The point is that, generally, each tile is stored to RAM (whatever sort of RAM it may be) once and only once. If it appears on the screen multiple times, it is still only stored once, but it is referenced multiple times. The references appear in a grid called a "tilemap." | 
|
The contents of the tilemap are not important for us, not right now. Just know that each entry in the tilemap stands for one 8x8 chunk of the actual screen, and contains palette information, rotation and mirroring information, as well as the "index" or number of the actual tile we're displaying. The index is what we're paying attention to right now. Each tile is as such numbered in RAM; thus, when a game whose text is stored in ASCII displays a capital letter A, it is simply referencing Tile 0x41 in whichever tilemap entry corresponds to the tile it appears in on the screen.
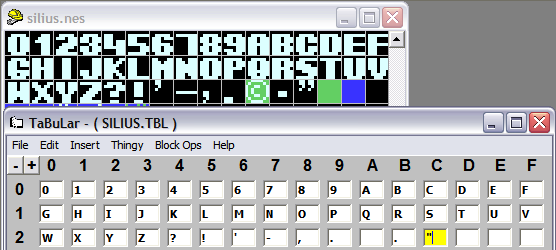
So, I bet you're wondering what the point of that little tangent was. Well, it just so happens that tile data is often (not always, but often) stored in RAM in the same order it's stored in ROM. Let's open Silius up in TLP and take a look at its font layout - scroll down 'til you find it, and make sure you hit the right arrow on your keyboard to compensate for the game's iNES header (more on headers in a later section.)
|
Here's a snap of Journey to Silius's font, as viewed in Tile Layer Pro. Now, I haven't done this for you, so you're
going to have to use your imagination a bit here... but it's probably a good excersize regardless, as if you're going
to succeed as a romhacker you'll be doing a lot of critical thinking and extrapolation anyway. Notice how the first
"row" of font characters contains 0-9, A-F. Notice also that this corresponds to all of the single-digit hexadecimal
numbers as well! Let's then number them: column 0, column 1, column 2, all the way through column E and column F. Each
column has its corresponding letter on top of it. Let's do the same thing with the rows - even though the rows don't
have a hex digit associated with them. Use your imagination. The first row is Row 0, the second is Row 1, and so on. Now comes the fun part. |
Now that you've got this picture in your mind, there are two simple ways to build a table. The first is to relative search; the second is to eyeball it. While neither is fullproof, I'll be teaching you both. Do note that relative searching works far more often than eyeballing it.
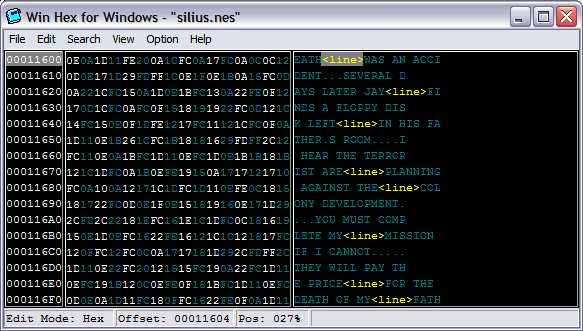
Let's take that second screen of Silius as our guinea pig text. It states in all-caps block letters, "THE EVENING NEWS REPORTED THAT JAY'S FATHER'S DEATH WAS AN ACCIDENT." All-caps makes our relative search easier. Remember that the algorithm assumes that B=A+1; mixed-case text will break this, as capital A isn't usually next to lowercase b in games' fonts. So, let's open Silius up in Windhex. In the Search menu, ask for a Relative Search, and pick a suitably long word to search for. The longer the word, the better - you'll get fewer false-positives. I used the word ACCIDENT; it turns up one match for A=0A. Double-click that to go to the address listed, and you won't see much of anything. Some releases of Windhex will allow you to build a table based on this; the table editor can be unnecessarily complex, however, and it can add characters (oftimes, quite a lot of them) to the table that really shouldn't be there. But now that you know that 0A=A, you can use that to fill in your table.
Still have that image of rows-and-columns in your mind? I hope so, because what we're going to do now is open TaBuLar and put that mental image to work. When you launch TaBuLar, it should bring up a blank 16x16 grid. Each square in the program corresponds to a table entry as such: XY=Z, where X is rows, Y is columns, and Z is the letter that the byte prints. In this case, 0A=A; row 0, column A, prints letter A. If we hover over the corresponding box with the mouse, a tooltip "0Ah (10) -- Value:" will pop up. We know we're in the right place, so let's type an A in there. Or even better - we know, thanks to the relative search that A+1=B, A+2=C, and so on through A+25=Z. We then know that the entire alphabet is tabulated, starting with 0A=A, 0B=B, 0C=C... 0F=F, 10=G, 11=H... and so on. So, to save ourselves some time... put a cursor in the 0A box. (It turns yellow.) Then hit up the Insert menu and tell it to put in a capital English alphabet! Save your table (as a Hexposure table) - call it something like silius.tbl if your rom is silius.nes, then load the table in Windhex (file menu - open table.)
Now you can go into Windhex's built in Table Editor (options menu) to fill in the blanks. The version of Windhex that
I've provided for you is old, however its Table Editor functions in exactly the same manner as your basic traditional
table editor: notepad. .tbl files are, in fact, just text files with a different extension. So, simply by looking at
the game in the hex editor and comparing it to a screenshot, we can see that 0xFC prints out a space. Open Windhex's
table editor, scroll down to the bottom, type "FC= " and hit enter. Then save it, and close the table editor. All of
a sudden, spaces show up correctly in the editor window! Further, recalling the previous lesson about control codes,
we can extrapolate that 0xFE prints out a linebreak. Let's add "FE=
That's how relative searching works, in a nutshell. We can continue to extrapolate, adding table values based on what shows up in-game, but this generally requires a lot of trial-and-error testing. So, instead, I'm going to teach you how to eyeball it.
Eyeballing it doesn't always work. It's usually best used in conjunction with relative searching, as a way to fill in the blanks, but you can sometimes even build a near-complete table based on eyeballing it alone and nothing else. (Control codes will still require extrapolation, trial-and-error testing, and critical thinking.) Recall your rows-and-columns mental image of the graphic in TLP, and recall how we did rows-and-columns with TaBuLar... this isn't really easy to explain, and it requires a bit of a leap of faith on the mind's part, but basically when you look at a grid in TLP, you're looking at the same grid you see in TaBuLar. So, if the character in row 0, column 0 is the number 0 in TLP, it might be 0 in the game's table as well. This works better if you have a full compliment of 256 characters, or if your font starts at a fairly "regular" address, keeping in mind that it's hard to explain what a regular address is. But either way, once you've done your relative search, it's fairly easy to see the relationship between how the font graphics data is stored in-game and how it appears in your table file:
Well, there you have it - the basics of table generation. Be sure to open up your table file in notepad (or your text editor of choice); it's just a plain text file, after all, and it's worthwhile to see what it looks like in a simple text editor. You can click here to download my Silius table if you want to compare it to yours; I only added linebreak control codes, so if you've added more, yours might be a little different. You can also look at the game in YY-CHR if you're interested in another illustration of the nature of tables; hover the cursor over a letter and look at the "Bank:" value that pops up in the little pane below the viewer.